If you want to know how to tell if a photo is photoshopped, start with its source and compare the strongest available copies. Then inspect suspicious edges, repeated detail, lighting and metadata in context. These checks can identify questions or demonstrate differences between versions, but appearance alone rarely identifies the editing software or proves that a scene is deceptive.
This is a practical first-pass workflow for a picture you have encountered online. It helps you decide whether to use it, request more information or stop short of a verdict. You do not need to run every forensic technique. You need a specific question, a reliable record and enough evidence for the decision you actually face.
Decide what “photoshopped” means in your case
People use the word for very different things: a pasted person, an object removed from a room, an ordinary color adjustment or an entirely generated picture. It can also be shorthand for “the caption is wrong.” Separate those meanings. A genuine photo with a false caption is a source problem even when no visible subject was changed.
Write one sentence about the disputed claim. For example: “The seller says this is the actual room currently available,” or “The post says these people met yesterday.” That sentence makes the review relevant. A perfectly plausible image is still insufficient evidence for a transaction or a current event if its source does not support the claim.
Next, name the detail that would change your decision. In the room example, removing visible damage matters more than the photographer adjusting exposure. In the meeting example, adding a person matters more than resizing the file. You can now prioritize meaningful discrepancies instead of treating every processed pixel as a scandal.
SWGDE’s Best Practices for Image Authentication, version 2.0, distinguishes questions about an image’s representation from analysis of its content. Keep that distinction in your own language: “This version contains a change” and “this post makes a false claim” are related possibilities, not identical conclusions.
Start with the best copy and its publisher
Open the actual source page rather than relying on a forwarded thumbnail. Record the image’s attribution, caption, publication context and any link to a larger copy. If a friend sent it to you, ask where they found it. The absence of a source is a reason to slow down, not proof that your friend created a fake.
Save the file you received before annotating it. Make a separate copy for crops or enlargement. Label a screenshot as a screenshot and a website download as a website download. A page’s “download original” button may provide its largest stored version without providing the photographer’s untouched camera file, so do not assume more than you know.
Ask the publisher a small, concrete question: “Can you provide the source photo and explain any edits?” A request for the unedited file may be appropriate, but some legitimate sources cannot supply it immediately or cannot share it for privacy reasons. Record their answer and assess the surrounding evidence rather than treating delay as a confession.
Protect people in the image. Avoid uploading private family pictures, identification documents or intimate material to unfamiliar websites. You can often investigate a public page’s history or inspect a file locally without circulating it further. If the material could affect safety or a serious allegation, preserve the evidence and get appropriate help before sharing your suspicion publicly.
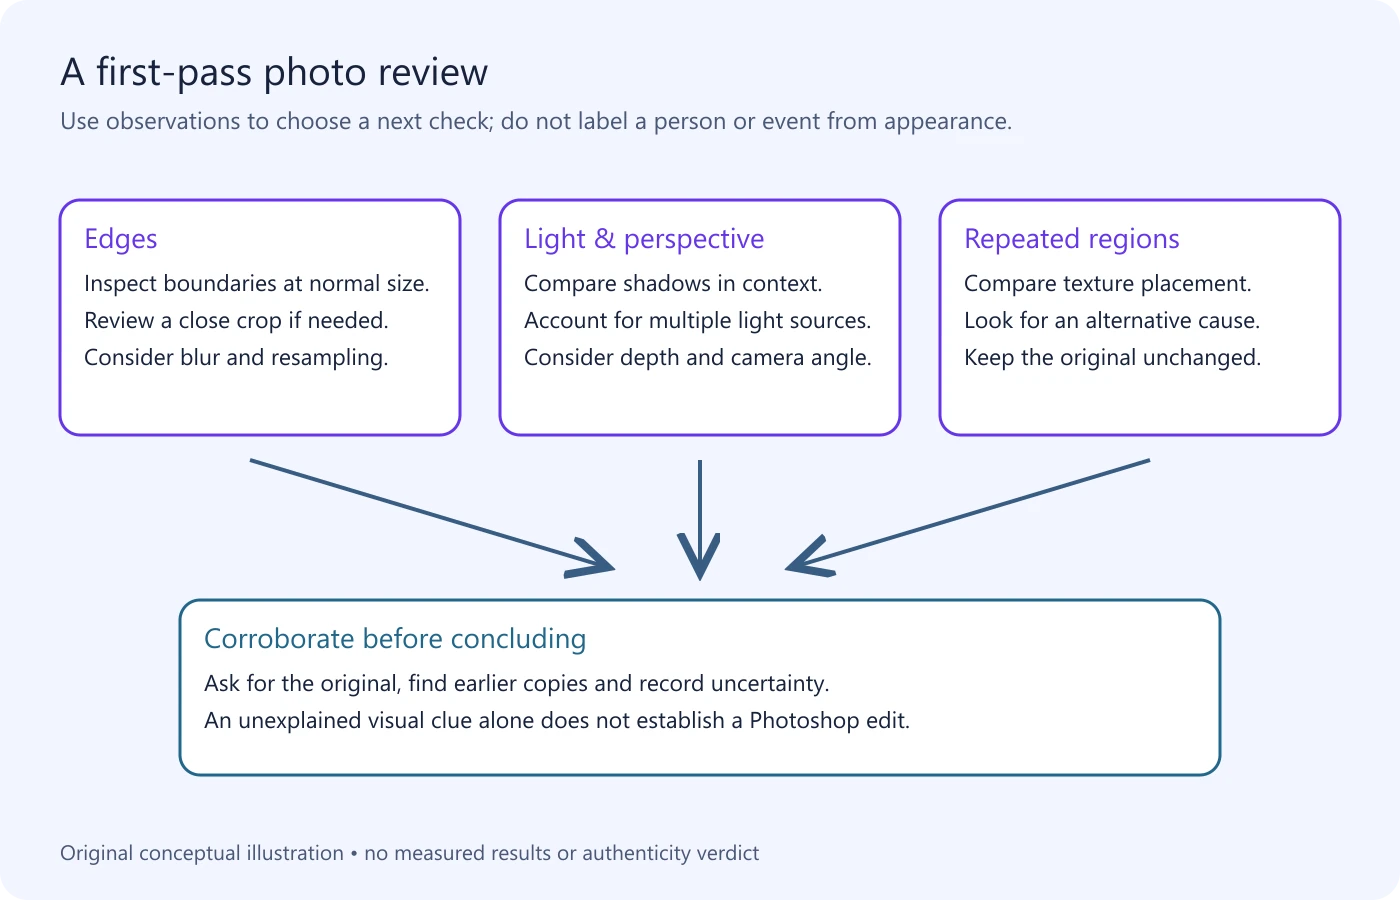
Use a two-pass review: whole scene, then local detail
First view the photo at a normal size. Describe what is visible and what the attached story asks you to believe. Look for clear scene contradictions, such as a cropped sign that could change the location claim. Do not start by zooming until ordinary texture becomes abstract blocks. That can make almost any compressed image look unusual.
For the second pass, inspect only the regions relevant to your question. If the concern is an added person, review the outline, contact with nearby objects and relationship to the scene. If it is an altered sign, compare lettering, surface shape and surrounding details. Give each observation a location so another person can check it.
Use a neutral note, such as “The left edge of the sign appears unusually sharp in this copy.” Leave the cause blank until you have evidence. You might later discover a pasted sign, a sharpening artifact or a publication overlay. The first observation remains valid even if the initial suspicion turns out to be wrong.
Keep the view you used. A screenshot of an annotated crop can help explain a question, provided it is labeled as your annotation and remains separate from the received file. Include a wider view so the crop does not hide context. This makes your review more useful than a single red circle presented as proof.
Inspect edges and repeated areas carefully
Look around a disputed object’s boundary. A cutout may suggest a question when its outline behaves differently from nearby boundaries under similar conditions. But ask whether the comparison is fair. Hair against a bright window and a sleeve against a dark wall naturally offer different visibility. Do not compare them as though they should have identical edges.
Search for repeated distinctive detail when the concern is removal or copying. A matching arrangement of cracks, leaves or marks is more informative than two broadly similar patches of grass. Save the proposed pair side by side. Explain what matches and what differs rather than declaring that any repeated pattern is cloning.
Ordinary objects also repeat. Floor tiles, wallpaper and manufactured surfaces can form convincing near-matches. Ask whether the surrounding layout explains the pattern. If you find a possible duplicated patch, review its relationship to neighboring seams and objects. A reasonable alternative explanation deserves a place in your notes even when you do not yet know which explanation is right.
Compression complicates edge inspection. SWGDE’s Digital Image Compression and File Format Guidelines, version 3.0, describes blocking, local color distortion and loss of fine detail. In a small repost, those processes can limit what an apparent halo or soft patch tells you. Try to obtain a better source before turning the boundary into an accusation.
Compare light, contact and perspective within the scene
A useful visual question is whether a disputed object fits its immediate surroundings. Look at where it touches the floor, whether another object passes in front of it and how its size relates to nearby objects at comparable distances. These are prompts for examination. They are not rigid rules that every photo must satisfy in an obvious way.
For lighting, identify the visible or implied sources. An outdoor scene may mix sun, shade and reflections. An indoor scene may use several lamps. Compare objects illuminated by the same apparent source before calling different brightness a mismatch. If the image does not show enough of the environment to establish the light arrangement, record that limit.
Shadows are worth describing, but avoid simplistic formulas. Write “I cannot reconcile this shadow with the visible arrangement” rather than “all shadows must point exactly the same way.” The first statement gives a reviewer a question; the second may ignore scene geometry or another light source. A second photograph can reveal the environment that one crop leaves out.
For perspective, check whether the claimed comparison is meaningful. A person’s appearance can vary with viewpoint and distance, so a different-looking face is not automatically a replaced face. When identity is the actual question, the existing reverse face search guide explains the separate limits and privacy concerns of matching public images. Do not turn a visual resemblance into a proven identity.
Check metadata without making it the verdict
If you have a file rather than only a webpage preview, inspect the available metadata with a suitable viewer. Note any camera, software or date fields, keeping their exact labels. An embedded date is not the same as the file’s download date on your computer. If you cannot interpret a field, preserve the value and label it unresolved.
A software name is a clue about recorded processing. It does not reveal every action performed, whether the action was deceptive, or whether that application created the original scene. Likewise, a convincing camera name is not enough to verify a claim. Your next step is to compare the record with what the publisher says happened.
NIST’s AI 100-4 report, section 3.1.2, explains that metadata may be changed or stripped, including during sharing or for privacy. That makes “no EXIF” an information gap. Do not use it as a hidden universal rule that every edited picture lacks data or every untouched picture retains it.
If the photo has Content Credentials, read the supported validation result and recorded actions. The C2PA 2.4 specification describes signed provenance, not proof of the truth of an external event. The existing Content Credentials article explains how to separate a signed production record from the caption’s claim.
Search for an earlier version and compare actual differences
Use reverse image search to locate related copies, then open the result pages. Google’s official image-search instructions describe searching from a file or image URL and finding similar images or sites containing them. The relevant result for your task is a source to examine, not an automatic authenticity certificate.
Begin with the full image so you retain context. If results are broad, try a relevant crop, such as a recognizable sign or unusual background feature. Keep both searches in your record. A crop may improve discovery, but it can also remove the detail that distinguishes your image from a different picture.
When you find a candidate earlier copy, compare stable details. Matching cracks, object positions and reflections can help establish whether two images share a base photograph. Then describe the material difference. A changed sign in otherwise matching surroundings is more concrete evidence than a general feeling that one copy looks wrong.
Check attribution and dates on the result page. A page date may refer to publication or later updating, and the first result need not be the original. Preserve that uncertainty. For a picture extracted from footage, follow the existing video-frame source-search workflow to locate a clip. No match means that your search has not found a match; it does not mean the image is genuine or generated.
An original triage worksheet you can reuse
The worksheet below turns a vague suspicion into a reviewable decision. Fill in the observation column with what you can actually point to. Then make the next action specific enough that another person could carry it out. This is an editorial aid, not a validated forensic scoring system or an instruction to add up suspicious features.
| Observation | Ordinary alternative to consider | Useful next action |
|---|---|---|
| Unusually sharp boundary | Different focus, contrast or export processing. | Request the larger source and inspect the surrounding region. |
| Two similar texture patches | A repeating physical surface or low-detail copy. | Compare distinctive marks and wider layout. |
| A shadow seems inconsistent | Another light source or incomplete scene context. | Find an additional view and identify the light arrangement. |
| No capture metadata | Sharing, privacy or conversion removed it. | Ask for the source file and acquisition history. |
| An older copy has different content | A different exposure or uncertain source chronology. | Verify the shared base and document the exact difference. |
| The caption names a recent event | A genuine image has been reused with new context. | Check the event through an independent primary source. |
For each row that matters, write one sentence beginning “I observed…” and another beginning “This would be clarified by…”. Keep the decision separate: “I will not reuse this image until the source is clarified.” You can take that cautious action without claiming to have solved the editing question.
A fictional review: the suspicious studio photograph
Consider a fictional still life used to illustrate the workflow: a blue cup, a book and a small vase on a desk. An online listing presents it as an unaltered photograph of a set for sale. You suspect that a scratch on the desk has been removed. This example is constructed for explanation; it is not a real seller, a product screenshot or a reported tool test.
Start by preserving the listing’s image and recording its claim. At normal size, the desk looks smooth. In a magnified view, a small region near the cup appears softer than the neighboring surface. You write down the region, but the appearance alone does not establish removal. It could be out of focus, reflective or affected by the quality of the delivered copy.
You ask for another angle and the source photograph. The seller supplies a second image, but its viewpoint differs. A dark line appears near the same location. That may be a scratch, a shadow or a different part of the surface. Comparing two different views requires caution; do not mark them as an identical before-and-after pair.
Suppose instead you locate an earlier publication showing the same cup, page position and reflections, with a clearly visible scratch in the disputed region. You now have a stronger comparison. Record the matching base details and the changed area. The supported conclusion is that the two published versions differ there, provided you have correctly matched them. You still have not identified Photoshop as the software.
For your practical decision, request an up-to-date view of the desk and clarification of the edit. If the seller confirms retouching and provides a current unretouched view, you can assess the actual condition. If they cannot, you may decline the purchase. Neither choice requires a claim about the editor’s intent or a fabricated probability of manipulation.
The value of the exercise is the sequence: ask a relevant question, examine a specific region, seek better evidence and act within the evidence’s limits. You can reuse the same sequence for an altered event photo, a missing object or a misleading promotional image without accusing someone from a compression artifact.
Use tools when they answer your remaining question
A metadata viewer can help inspect recorded fields. A reverse-search service can help find other copies. A comparison viewer can help display a difference. These tools have useful tasks even though none provides a universal “not Photoshopped” certificate. Choose the function you need before searching for a dramatic detector.
If a forensic tool flags a region, ask what its output means for this file. Save the input copy, the relevant result and any settings you know. Check whether an ordinary alternative explains the alert. Running several services is not automatically independent confirmation: they may respond to the same compression or image feature.
A high-stakes allegation deserves more than casual triage. The existing video forensics guide explains the broader evidence-led approach when the source is a clip. Still images require their own appropriate examination. Do not assume a video detector can authenticate arbitrary photos, identify a person or decide whether a purchase is legitimate.
Separate an answer you can support from an action you can reasonably take. “I cannot verify this listing photo” may justify requesting more evidence. It does not justify publicly labeling the seller a fraudster. A tool result becomes useful when it narrows that decision, not when it supplies a forceful word for an accusation.
Record the outcome and stop before the evidence runs out
Close your review with a compact note: the claim, the examined copy, the observations, the reference material and the remaining uncertainty. Choose language such as “this version differs from an earlier matching copy” or “no material change was established from the available files.” Avoid “proved real” when your checks covered only a limited question.
Use this practical checklist before reusing or relying on the picture:
- You can identify the source and the exact claim being checked.
- You preserved the received file separately from your annotations.
- You reviewed the whole scene before magnifying selected regions.
- You considered an ordinary explanation for each important anomaly.
- You checked any comparison image’s source and relationship.
- Your conclusion states both the finding and its limit.
If you lack enough information, stop at an unresolved result. Ask for a better source or choose not to rely on the picture. Continuing to zoom, sharpen and rerun tools cannot create a trustworthy history that is absent. The most useful answer to “is this photo edited?” may be a documented difference, a corrected caption or an honest request for evidence.
Questions about checking a photo
Can you detect Photoshop edits just by looking?
You may notice an inconsistency or identify a difference from a verified comparison. Appearance alone usually cannot establish the software used, and a clean-looking image is not a guarantee that nothing changed.
What should I check when a photo has no metadata?
Preserve the copy, ask for its source, search for related versions and check the caption’s claim independently. Missing metadata is a limitation, not a verdict. A larger source may help more than another pixel-level test.
Does a Photoshop software tag prove the photo is fake?
It can indicate recorded processing, but it does not explain every action or whether the result is misleading. A routine export and a material change are different possibilities. Ask for the production history.
Is a reverse image search match proof of the original?
No. It is a candidate source or reference. Open the page, inspect its attribution and compare the image. Search order and webpage dates do not automatically establish capture time or authorship.
What if the picture came from a video?
Find the source clip and review the surrounding sequence. A frame can omit timing, audio and context. Use a supported video-analysis workflow for the video; do not treat a still-photo check as a full examination of the clip.
References
- SWGDE: Best Practices for Image Authentication, version 2.0, March 3, 2025.
- SWGDE: Digital Image Compression and File Format Guidelines, version 3.0.
- NIST AI 100-4: Reducing Risks Posed by Synthetic Content, section 3.1.2.
- C2PA: Content Credentials Technical Specification, version 2.4.
- Google Search Help: Search with an image on Google.