
A moire pattern is a larger, often wavy pattern produced when fine repeating detail interacts with another repeating structure or a sampling grid. In photographs and video, a perfectly ordinary shirt, roof or screen can acquire ripples that were not visible to the person looking at the scene. The pattern is real in the delivered image, but it need not describe a pattern on the original object.
That distinction matters when a clip looks suspicious. A rainbow shimmer on a jacket can come from image formation or resizing rather than an invented person. The useful question is not simply whether the ripples look strange. It is where they first appear: in the camera capture, in a later copy, or only in the way you are viewing that copy.
Why two fine patterns can produce one broad ripple
Imagine two transparent sheets, each printed with closely spaced vertical lines. When their lines coincide, the combination looks relatively open. Where one sheet’s lines fall into the other sheet’s gaps, the combination looks darker. If their spacings differ slightly, alignment gradually comes and goes across the sheets. You see broad bands even though neither sheet contains those broad bands by itself.
Rotate one sheet a little and the broad pattern changes direction. Slide it and the bands travel. This is a helpful physical model for understanding interference between repeating structures. It does not mean that a camera literally lays a printed grid on your clothes. A digital camera takes discrete measurements, and sufficiently fine scene detail can be represented by the wrong larger-scale pattern.
Consider an original arithmetic example: one drawing contains 20 equally spaced line cycles per centimeter, while a second contains 21. Their relative alignment completes a cycle once per centimeter because their frequencies differ by one cycle per centimeter. The broad envelope is much easier to see than either fine spacing. This simplified overlay calculation explains a beat pattern; it is not a prediction of a particular camera’s sensor response.
Real pictures add perspective, lens blur, sensor layout, color processing and imperfect repetition. A suit fabric may therefore produce curved, colored or irregular bands instead of tidy straight stripes. Recognizing the broad mechanism helps you avoid demanding a single visual signature. There is no universal ripple shape that identifies one camera model or one editing application.
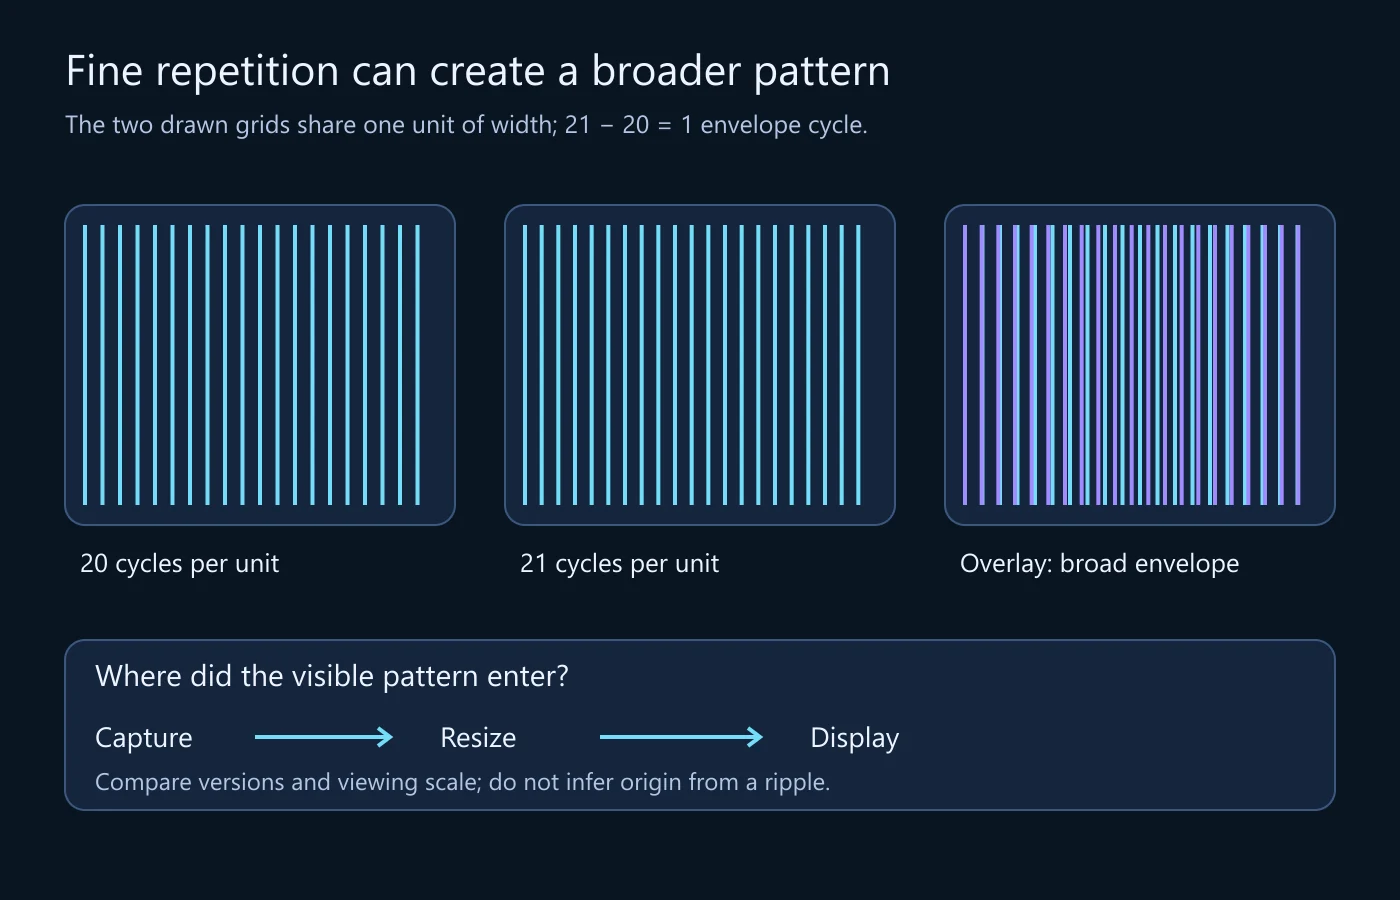
The three places a moire pattern can enter
1. At capture: fine detail meets the camera’s sampling
A sensor cannot record unlimited detail. When a repeating subject projects onto the sensor at an unfavorable scale, the recorded samples can support a false lower-frequency structure. Woven fabric, mesh, roof tiles and tightly spaced architectural lines are useful places to look because their repetition is organized. Random texture can lose detail too, but it does not necessarily create such conspicuous broad bands.
Nikon’s explanation of moire and false color describes this problem in patterned subjects and the tradeoff involved in optical low-pass filtering. Its camera examples are model-specific, not a promise that every contemporary camera includes the same filter. In general, limiting problematic fine detail before sampling can reduce aliasing, but that also affects the detail retained.
A camera’s color reconstruction can influence the appearance of the artifact. Keep that stage separate from the question of spatial interference. Demosaicing concerns reconstructing color channels from filtered sensor samples; this article concerns why repetition turns into a different visible pattern. If you investigate both, do not count two descriptions of the same region as two independent signs of manipulation.
For existing footage, changing the camera is not an available remedy. The important consequence is evidential: if the pattern was already recorded, enlarging the image does not recover the unsampled fabric. A sharp-looking correction may suppress the ripple without restoring the object’s exact original threads or colors.
2. During resizing: one image grid becomes another
A high-resolution image can look clean at one size and develop a pattern when reduced. Resizing requires deciding how existing samples contribute to a new grid. If fine repetition is reduced without adequate filtering, the new copy can acquire aliasing that the larger copy did not visibly show. Conversely, a carefully filtered reduction can make a capture artifact less noticeable.
This explains why a social-media thumbnail can look worse than an opened image. The thumbnail and enlarged view may be separate derivatives, not simply one file displayed at two sizes. Downloading a permitted file and checking its actual dimensions helps distinguish those possibilities. The file’s name, including words such as “original” or “HD,” is not enough to establish its processing history.
A screen capture introduces another transformation. A screenshot saves a particular rendered view, including any scaling already applied by the viewer. A phone photograph of the screen adds a physical pixel structure, another lens and another sensor. Neither is a clean substitute for the supplied media file when you want to locate the first appearance of an artifact.
3. At display: the view changes while the file stays the same
A browser, image viewer or video player can rescale content to fit its window. Fractional zoom and display scaling can change the relation between image pixels and display pixels. A ripple that changes while you resize the window may be associated with presentation rather than newly altered stored content. That observation narrows the question; it does not prove that the source was free of all processing.
Try a supported actual-size view and compare it with a fit-to-window view. Note what the application means by actual size, especially on high-density displays. Do not assume a screenshot from a different device reproduces the same pixel mapping. Record the viewing condition in plain language: “visible in the small browser preview, less visible in the downloaded file at this viewing size.”
What changes in a moving picture
When a person moves, the fine fabric pattern shifts relative to the sampling grid. A small change of distance or angle can change the apparent banding dramatically. It may look as though a jacket’s texture is crawling independently of its wearer. The object does not need to change material for the recorded relationship to change.
Camera movement, refocusing and optical zoom can also alter the scale of the projected pattern. Later digital stabilization or resizing adds another possible stage. You cannot identify the responsible stage merely because the ripples move. Instead, ask whether an earlier version shows the same region changing at the corresponding moment.
Separate these spatial effects from an entire frame brightening and darkening. Flicker involves illumination and capture timing; a moire pattern involves a relationship between spatial structures. They can coexist, particularly when filming a display, but they are not interchangeable explanations. Likewise, motion blur can soften the fine detail without explaining every band visible across the picture.
If a pattern appears only in a repost, compare corresponding events rather than equal player timestamps. A repost may contain a trim or speed change. Choose a recognizable gesture or object position to align the versions. Otherwise, you could mistake two different moments of a changing capture artifact for proof that the repost introduced it.
A practical comparison: the interview jacket
Suppose an interview clip shows colored waves across a speaker’s checked jacket. A small embedded player makes the waves especially prominent. You have a downloadable version from the publisher and a lower-resolution repost. The task is to understand the jacket’s appearance, not to determine the interview’s truth from a texture.
Start with the publisher’s file in its usual playback view. Find an interval with the jacket reasonably visible, then inspect the same interval in the repost. Keep surrounding motion rather than selecting only the most dramatic frozen frame. Note the dimensions of each file and whether one was obtained through a platform’s download feature or through a screen capture.
Now change only the viewing scale of one file. If the banding changes with the window size, you have evidence that presentation affects what you see. If the banding remains at a stable place within the jacket across viewing scales, that suggests it is already represented in the file, although a later display stage may still change its visibility.
Next compare the two files at reasonably comparable display sizes. If the smaller repost adds a coarser pattern, resizing is a plausible contributor. Do not call that a demonstrated export method unless the processing history or a controlled reproduction supports it. A platform may have made several transformations you cannot reconstruct from the output alone.
A useful result might be: “The colored waves are visible in both supplied versions, and the small-player view increases their prominence. Fine repeating clothing is consistent with a sampling artifact. These observations do not establish the interview’s origin.” That is more informative than either “definitely AI” or “definitely authentic.”
Choose an observation that can distinguish the layers
| Observation | Useful next comparison | What remains unresolved |
|---|---|---|
| Pattern changes with window size | Same file in actual-size and fitted views | Whether capture also contributed |
| Only a small repost looks affected | Corresponding interval in the larger source copy | Which export operation introduced it |
| Waves move across repeating clothing | Adjacent moments and changes in scale or angle | Whether other parts of the clip were edited |
| Artifact is seen in a photograph of a screen | Obtain the underlying media file | The original file’s appearance |
The comparisons above are investigative choices, not authenticity scores. Their value comes from holding one factor constant. Switching the file, player, display and viewing size together can produce a dramatic difference without telling you which change mattered. A modest comparison with a clear scope is more useful than a complicated collection of unmatched screenshots.
Reducing moire when you control the recording
If you are filming a new interview, inspect the actual recording at useful sizes before the main take. A small camera preview may conceal a problem that becomes obvious in the delivered frame. Test the intended clothing and background, not just a neutral stand-in. Repeating texture is part of the capture setup, so composition decisions can matter as much as a menu setting.
Changing the camera-to-subject distance or framing can move fine repetition to a different scale on the sensor. A slight angle change may alter its relation to the grid. Where practical, replacing the troublesome fabric or background is often more predictable than hoping later software will reconstruct it. These are options to evaluate on the actual setup, not universal settings that eliminate every artifact.
Focus and aperture changes can alter the fine detail reaching the sensor, but they also affect the picture you intended to make. Deliberately softening an interview to hide a jacket’s pattern may sacrifice the speaker’s eyes or other important detail. Compare results before committing and prefer a solution that preserves the main subject rather than trading away everything for one texture.
When delivering the recording, examine the actual final export and its thumbnail. A clean source does not guarantee every derivative will remain clean. Use a resizing method suited to reduction and avoid unnecessary intermediate resizes. Keep a high-quality source so you can revise the export instead of applying repeated corrections to a small already-processed copy.
Why removal is not recovery
Be particularly careful when estimating physical dimensions from the ripple. Its spacing in image pixels is not the spacing of the fabric’s threads. Several different subject spacings, camera distances and resampling histories can produce a similar broad pattern. Counting five visible bands across a sleeve does not tell you how many threads the sleeve contains. A ruler elsewhere in the scene does not resolve that sampling ambiguity by itself.
If your actual task is documenting a textile or printed pattern, obtain a separate capture designed for that detail. Include enough context to identify the region, choose a scale that resolves the repeating structure, and compare more than one framing before relying on a count. Keep the ordinary interview capture as a different record with a different purpose. The fact that one recording fails to describe a weave precisely does not make it useless for understanding the interview’s words or broad actions.
A moire-reduction control may reduce unwanted color, smooth a patterned region or use neighboring information to make the result less distracting. Those are legitimate presentation goals. They do not establish the exact underlying texture that would have been captured with a different sensor or setup. “Cleaner” describes the output’s appearance, not a newly verified account of the object.
For an evidential comparison, retain the received file and create a separate corrected copy. Explain which region was adjusted and why. If fine print or a fabric’s exact weave is the disputed detail, do not rely on an aesthetically repaired rendition as a measurement. Suppressing a false pattern can also suppress genuine small structures in the same region.
Sharpening deserves the same caution. Making a ripple’s edges crisper can make the false pattern look more definite. An enlarged, heavily sharpened crop may feel like stronger evidence simply because it is easier to see. Review the ordinary-size view first, then use close inspection to describe the issue rather than letting processing dictate the conclusion.
Distinguish moire from nearby explanations
Color fringes along strong edges can have an optical explanation. The existing guide to chromatic aberration addresses that different problem. A colored edge is not automatically a moire pattern: look for the relationship to fine repeated detail rather than labeling every unusual hue with one term.
Compression can produce blocks, ringing or loss of texture. Those artifacts may overlap a patterned region and change how a ripple looks. Avoid choosing between “compression” and “moire” as if only one process can affect a file. Describe the visible structure, identify the version in which it occurs, and keep unknown processing stages unknown.
A generated image can also depict ripples, and genuine recorded footage can be edited after capture. Therefore, finding a plausible sampling explanation does not authenticate the entire scene. It answers a narrower objection: unusual repeating texture is not, by itself, a reliable shortcut to identifying AI generation.
Three questions worth answering before you share a crop
Does a ripple prove that the image was manipulated?
No. Capture, resizing and display can each produce or emphasize spatial aliasing in ordinary material. Establish what the crop shows before attaching an origin claim. If a broader assessment is needed, the image forensics guide explains how file history, visual observations and independent context answer different questions.
Can a higher-resolution copy settle it?
It can improve the comparison, especially when the smaller version introduced additional aliasing. It cannot guarantee recovery of information already lost at capture. Ask for the best available source, not merely a larger file: an upscaled derivative can contain more pixels without containing more original scene detail.
What is the most useful thing to retain?
Keep the actual versions you compared and a short record of the viewing conditions that changed the pattern. Include a normal-size frame for context as well as any close crop. That lets the next reviewer distinguish a recorded texture problem from an effect introduced by your own presentation.
The central lesson is simple: a moire pattern describes a relationship, not an accusation. Trace the relationship between the subject, the captured samples and the displayed copy. You will usually learn more from that chain than from staring harder at the strangest ripple.
Technical references
- Nikon: Moire & False Color — patterned subjects, false color and model-specific optical filtering.
- Foundations of Computer Vision: Image Sampling and Aliasing — the mathematical sampling framework behind the explanation.
The two-sheet calculation and interview-jacket comparison were developed for this guide; neither is presented as a camera test.