
Image forensics examines a picture’s file structure, recorded history and visual content to investigate how it was made or changed. A useful examination combines several kinds of evidence, checks ordinary explanations for suspicious features and states what remains unknown. One missing metadata field, bright error map or detector score cannot answer every question about a photograph.
This guide helps you design an evidence-led examination of a still image. The practical outcome is a small investigation record: a precise question, preserved material, observations, competing explanations and a conclusion another person can follow. It is an educational method, not a substitute for a qualified examiner when the image affects someone’s safety, reputation or legal rights.
Start with a question the evidence can answer
“Is this picture fake?” bundles together several different problems. You might want to know whether an object was added, whether a photograph came from a named camera, whether a caption describes the right event, or whether the copy has changed since you received it. Those questions require different evidence. Separate them before opening an analysis tool.
For example, a photograph of a crowded railway platform could be genuine but paired with the wrong city. Another version could retain the correct city while adding a person. A third might be a harmless resized copy of the original. A test of file integrity cannot distinguish all three. A search for an earlier publication might solve the city question without explaining the person’s pixels.
Write your question as a proposition with a scope: “Does the available image support the claim that this person was present?” Then name a plausible alternative, such as a composite or an incorrectly identified person. You have something to investigate without making the accusation your starting assumption.
In its Best Practices for Image Authentication, version 2.0, SWGDE distinguishes authentication from content analysis and evidence integrity. Its guidance also recognizes that some single-image manipulations may escape examination. That is a reason to define a narrow task, not a reason to assume every image is unknowable.
Preserve the material before you improve its appearance
Keep the best available file exactly as received. Save a separate working copy for viewing, annotation or export. Record where you obtained it, when you obtained it and what the sender says it represents. If you receive only a screenshot, label it a screenshot. Do not quietly upgrade that description to “original photograph.”
A useful acquisition note might read: “Downloaded JPEG from the publisher’s public image page; page caption recorded separately; camera original not supplied.” This tells a later reviewer what material was actually examined. It also prevents a common confusion: the first copy in your possession is not necessarily the first version ever created.
If appropriate to your workflow, compute a cryptographic hash of the preserved file and record the algorithm. A matching hash helps establish that a later working copy has the same bytes. It does not show that the photographed event happened. Renaming a file and changing its contents are different operations, so record the original name as context rather than treating the name as proof.
SWGDE’s imagery-integrity guidance, version 1.1, recommends preserving received imagery and processing copies. Its distinction between integrity and authentication matters here. Keep your annotations outside the preserved file, and record any transformation used to create a work product. For corresponding procedures on moving images, see the existing video authentication guide.
Build an evidence map before selecting tools
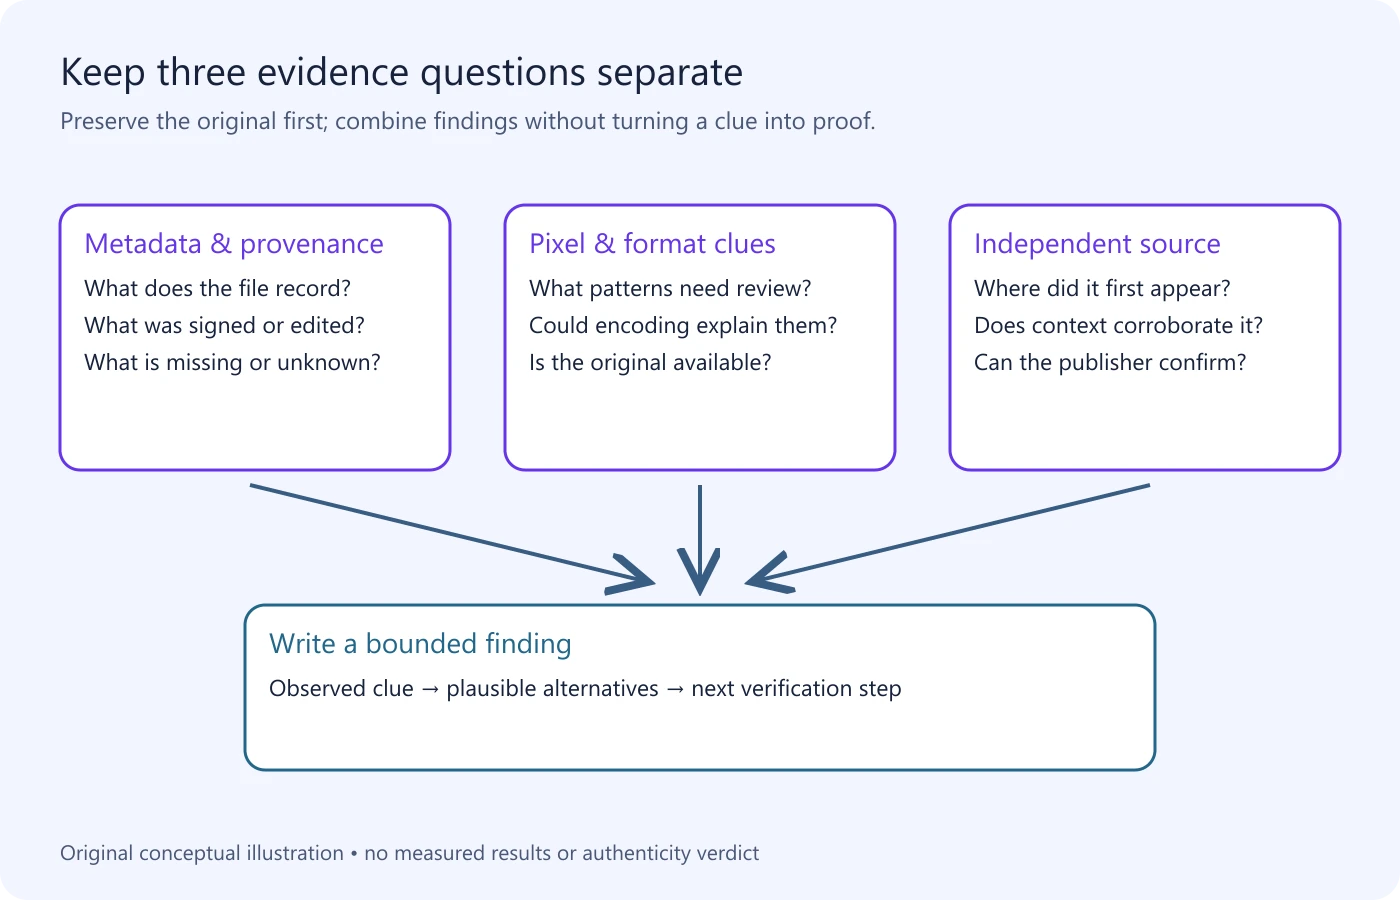
List the evidence you have, the question each item can address and what you would need next. A file, a caption and an eyewitness account are separate items even when they arrive in the same message. Two websites repeating the same post may be one source chain, not two independent confirmations.
The table below is an original planning aid. It organizes questions rather than assigning reliability scores. No row supplies a universal verdict. Use it to prevent a visually impressive output from answering a question it was never designed to test.
| Evidence | Useful question | Important boundary |
|---|---|---|
| Preserved file and hash | Has this copy changed since acquisition? | Not whether the scene was truthful before acquisition. |
| Metadata and file structure | What recorded workflow is compatible with this copy? | Fields may be absent, editable or incomplete. |
| Pixel and scene examination | Where does a specific inconsistency occur? | Capture and ordinary processing can create anomalies. |
| Earlier matching photograph | What differs between these versions? | The earlier copy needs its own source assessment. |
| Signed provenance | Which assertions are bound to this asset? | Validation is not a verdict on the external story. |
| Independent event evidence | Does the claimed date, place or event hold up? | Context evidence may not identify an editing method. |
Choose the next action according to the missing evidence. If the dispute is about a pasted sign, an earlier high-quality view of that sign may be more useful than another general AI score. If the dispute is about location, spend time on the source and scene rather than attempting to infer location from compression.
Read image metadata as a record, not a witness
Image metadata is information stored with or associated with the file. EXIF commonly carries camera and capture-related fields; other metadata systems can carry attribution or editing information. Read the actual field name and value. A filesystem creation date, an embedded capture field and the publication date of a webpage are not interchangeable clocks.
Make a simple field log. Include the value, where it came from and any ambiguity. If a date has no explicit timezone, record that uncertainty instead of silently converting it. If the file names a software application, ask what operation that field could represent. It may indicate an export workflow without identifying a specific deceptive edit.
NIST’s AI 100-4 report, section 3.1.2, explains that metadata can be altered or removed, including for ordinary sharing and privacy reasons. The practical consequence is symmetrical: a reassuring field is not enough to authenticate a scene, and an absent field is not enough to condemn one.
Compare the recorded information with the asserted history. A visible editor tag is a finding to discuss with the publisher, not a complete reconstruction of the image. Ask for the unexported source if it exists, a description of changes and a contact who can clarify the workflow. A coherent explanation is useful context, but preserve the distinction between a person’s statement and a technically demonstrated fact.
Understand the format and compression context
The file extension is an initial clue, not the whole format analysis. A forensic tool may report the actual encoding, dimensions and internal structure. Record what it reports and whether the copy is a thumbnail, a screen capture or an export. If the image came through several services, you may be inspecting the last service’s delivery process rather than the camera’s output.
Lossy compression discards some information. JPEG processing can leave block-related changes, soften detail and alter color transitions. The SWGDE Digital Image Compression and File Format Guidelines, version 3.0, explains these mechanisms and their artifacts. Those patterns establish why normal image delivery belongs in your alternative explanations.
Compare like with like. A smooth sky and a densely patterned jacket are different kinds of image content, so a tool may react differently to them without any pasted object. A sharp caption added during publication may differ from a softly focused background. That difference could document an overlay rather than falsification of the photographed scene.
Do not resave a questionable JPEG repeatedly while investigating it. Keep a record of the received copy and perform necessary experiments on derivatives. If an output looks dramatic only after several conversions, describe those conversions. Your analysis must account for artifacts introduced by your own workflow as well as artifacts already in the material.
Use pixel analysis to locate questions
Pixel-level methods examine patterns that may not be obvious at normal viewing size. Depending on the method, they can highlight local differences, repeated texture or processing traces. Their first useful role is often to identify a region for closer examination. Interpretation then depends on the image’s history, reference material and method limitations.
Error level analysis is one example of a compression-oriented view. It should not be treated as a colored truth map. If you cannot explain the method’s assumptions for the file at hand, the safe description is “this visualization highlighted a difference,” not “this visualization proved an insertion.” Keep a separate question about whether the difference has a plausible ordinary explanation.
For a repeated patch, inspect its position and surroundings. Is the proposed match a precise copied detail, or a recurring manufactured pattern? Is it large enough to carry distinctive information? Does the comparison still hold when you examine the underlying images rather than only a detector’s marked boxes? The analyst’s record should show the region and basis of comparison.
Keep specialized claims proportionate to your competence. Identifying a camera from sensor-pattern evidence or attributing an edit to a particular algorithm is more demanding than noticing a visual inconsistency. A tutorial does not turn an unvalidated tool into a laboratory method. If the question matters, pass the preserved files and your narrow observations to someone qualified to assess that method.
Examine the scene without turning clues into folklore
Review the complete image before zooming into one unusual edge. Describe the subjects, surfaces, visible light sources and areas obscured by other objects. Identify exactly where the disputed feature sits. This gives you a scene model against which to ask whether a local observation matters.
Compare objects under similar conditions. One face in direct light and another under a canopy need not share identical brightness. A sharp object close to the focal plane and a distant blurred one do not automatically form a composite. The useful question is whether the feature fits its local situation, not whether all pixels behave identically.
Write observations in inspectable language: “A narrow bright boundary is visible around this sleeve,” or “These two patches share the same distinctive scratch pattern.” Avoid conclusions such as “AI skin” or “Photoshop shadow” at this stage. Naming software from appearance alone overstates what you have established.
If the still comes from a video, return to the sequence. An occlusion or blurred hand may be easier to understand across neighboring frames. Video also supplies timing and audio relationships that one picture cannot provide. The existing video forensics article covers those different evidence layers; do not claim the still-image examination has already tested them.
Cross-check the source and compare versions
Search for earlier copies, larger versions and independent views of the scene. Record the page URL, its attribution and the relationship between images. Finding a visually similar picture is the beginning of comparison. Check whether it is the same exposure, a neighboring frame, a different photograph or a misleading near-match.
A comparison becomes useful when you can name a material difference. Perhaps a sign has changed wording while the surrounding cracks and reflections match. Perhaps a viral copy has cropped away a date marker. Show those differences without claiming the search engine has certified the earlier file. Search results are discovery mechanisms, not custody records.
Dates need careful wording. “This page was accessible with this image on the recorded date” is different from “the photo was taken on that date.” Keep publication chronology separate from capture chronology. A reposted old photo can undermine a current-event caption even when you cannot determine whether any pixels were edited.
For a frame taken from footage, the existing reverse image search for video guide explains how to locate related clips. Use only material you are entitled to search or upload. Private imagery, location data and sensitive faces deserve extra care; a verification task is not permission to expose someone else’s information.
Interpret signed provenance on its own terms
Content Credentials can provide signed statements associated with media. They are different from a freely editable caption or a conventional software tag. A validator may report information about the signer, recorded actions and whether the relevant binding checks passed.
The C2PA 2.4 specification defines a provenance system, not a judgment of whether content is good, bad or a true account of an external event. A valid credential can therefore be valuable while leaving your central question open. Read the claim that was signed rather than replacing it with a larger claim you wish it had established.
In your evidence log, separate “credential found,” “validation result,” “recorded action” and “my interpretation.” If no compatible credential appears, record that limited observation. Do not infer that the image is authentic or manipulated simply because its production history was not available through that mechanism.
The existing Content Credentials guide provides a more detailed reading workflow. This article’s narrower point is to keep provenance evidence alongside, rather than merged into, pixel analysis and event verification.
A worked investigation with an inconclusive result
The following scenario is fictional. It is an original reasoning exercise, not a reported experiment, genuine news incident or result from DetectVideo AI. Imagine a small JPEG depicting a public fountain. A caption says a large notice on the fountain announced a closure that morning. A reader suspects that the notice was inserted.
The material available is a reposted JPEG, its public page and a second wider photograph from a separate source. No camera original is available. Your question is whether the reposted notice supports the closure claim. You preserve both files and record the source of each before creating a magnified working view.
First, the repost has no useful capture metadata. That limits your reconstruction; it does not establish insertion. Second, the notice’s letters look sharper than the nearby stone. That gives you a region to investigate, but the difference could reflect the high-contrast lettering, the available copy or an added publication overlay. You cannot attribute it to software just by describing it.
Third, the wider photograph shows the same fountain without the notice. However, it does not establish that the two pictures were made at the same time. A notice could have been added physically between exposures. Fourth, the publisher has not supplied a primary closure announcement. That weakens the caption’s support even though it does not settle the pixel question.
Your conclusion is therefore divided: “The supplied repost does not independently establish a closure that morning. The image shows a local difference around the notice, but the available files do not distinguish digital insertion from ordinary alternatives.” Your next request is specific: a source photograph and the responsible authority’s notice. You do not need a dramatic fake verdict to produce a useful result.
Notice how the exercise avoids counting each observation as an independent vote. The missing metadata and sharp lettering may both arise from the reposting workflow. The second photograph is useful only within its own documented date and viewpoint. The framework keeps the investigation open to evidence that could change the initial suspicion.
Make your record reviewable and decide when to stop
A strong report distinguishes what you observed from what you inferred. Include the image identifier, acquired source, question, methods, relevant output, alternative explanations and unresolved items. Keep a copy of any tool result with its version or settings when available. Another reviewer should be able to find the region and understand your reasoning.
Use a bounded conclusion: “The available versions differ in this area,” “the received copy has no usable capture timestamp,” or “the evidence is insufficient to attribute the change.” Avoid invented probability percentages. An exact-looking number without a validated basis adds confidence theater rather than information.
NIST’s AI 100-4 discussion of detector evaluation warns about harmful false-positive conclusions and context-dependent performance. Treat an automated output as supporting evidence within its evaluated limits. Ask whether the tool’s task, supported input and known limitations match your question before using it to accuse a person or certify a file.
Use this closing checklist to decide whether another test would add evidence or merely repeat your suspicion:
- The exact question and examined copy are identified.
- The preserved file is separate from annotated derivatives.
- Every important observation names a region, field or reference.
- Ordinary capture, processing and context explanations were considered.
- The strongest conclusion fits the available evidence.
- The next request would meaningfully reduce uncertainty.
If the required evidence is unavailable, an inconclusive report is a legitimate stopping point. Preserve the record so new material can be assessed later. For high-stakes cases, seek an appropriate expert review rather than uploading sensitive files to a succession of unknown tools. Careful image forensics produces an accountable explanation, not merely a more persuasive label.
Questions about image forensics
What can image forensics reveal about a photo?
It can help investigate recorded history, file changes, visual inconsistencies and relationships between versions. What it can establish depends on the question, material and methods. It does not automatically verify every claim attached to the photo.
Can one forensic test prove that an image was edited?
A particular test may support a particular finding, but its scope matters. A documented before-and-after difference is different from an unexplained heatmap. Cross-check the result and distinguish ordinary processing from a material alteration.
Does missing EXIF metadata make an image suspicious?
Missing metadata limits the available information. Sharing, conversion and privacy workflows may remove it. Preserve what remains and seek source evidence rather than treating absence as proof of an edit.
Are image authentication and image integrity the same?
No. Integrity concerns whether the preserved material changed during a defined period. Authentication addresses questions about its asserted origin or representation. A copy can retain integrity after acquisition even if it was altered before you obtained it.
Can DetectVideo AI examine a standalone photograph?
This guide does not claim an image-scanning capability. DetectVideo AI’s relevant role here is to review a related video through its supported workflow. Still-photo examination and video evidence are different tasks.
References
- SWGDE: Best Practices for Image Authentication, version 2.0, March 3, 2025.
- SWGDE: Best Practices for Maintaining the Integrity of Imagery, version 1.1.
- SWGDE: Digital Image Compression and File Format Guidelines, version 3.0.
- NIST AI 100-4: Reducing Risks Posed by Synthetic Content, sections 3.1.2, 3.2 and 4.2.
- C2PA: Content Credentials Technical Specification, version 2.4.