

Tone mapping adapts the brightness relationships in an image to the range a destination can represent. In video, it commonly helps present high-dynamic-range material on a standard-dynamic-range output. It can compress bright highlights while retaining a useful relationship between the window, the face beside it and the shadowed room.
When that relationship is handled poorly—or when HDR values are interpreted as though they were SDR—the same scene can look washed out, harsh or unexpectedly dark. That is a presentation problem worth investigating. It is not automatically evidence that a person, object or event was generated or replaced.
Start with the scene, the signal and the screen
Picture a person standing inside a dim room beside a sunlit window. The actual scene contains a large range of light levels. The camera captures a representation of that scene, the file encodes it under particular conventions, and the screen produces light to display it. These are related stages, not interchangeable copies of physical brightness.
A display cannot reproduce every possible source range at arbitrary brightness. Tone mapping chooses how the available output range is used. An approach might leave middle tones relatively stable while gradually compressing the brightest areas. Another might darken much of the picture to reserve space for highlights. Both can show the same recorded objects while producing noticeably different impressions.
This is easier to understand if you distinguish content from presentation. A face can remain in the same place with the same expression while its displayed brightness changes. That does not mean every brightness change is harmless: making a scene seem darker can affect interpretation. It means that a changed appearance needs a description of the processing layer before it becomes an allegation about scene origin.
“HDR” also does not mean “everything should look brighter.” A presentation can contain dark regions and selective bright highlights. Judging a clip by whether it dazzles you is not a reliable format check. Look for the intended signal interpretation, the output capability and the processing that connects them.
Mapping is not the same as relabeling
A file’s encoded values need to be interpreted correctly before their appearance makes sense. Treating values intended for one transfer characteristic as though they used another can change the result dramatically. Simply calling HDR material SDR does not perform the deliberate brightness adaptation implied by tone mapping.
Android’s Media3 Transformer documentation makes this distinction concrete: it lists HDR-to-SDR tone-mapping options separately from interpreting HDR as SDR, warning that the latter can look washed out or display incorrectly. Those are choices in a particular developer framework, not instructions to change every phone’s settings in the same way.
The important general lesson is to ask two questions in order. First, is the source being interpreted according to its actual encoding? Second, how is that interpreted image being adapted to the chosen output? A display can be capable of HDR and still receive an SDR derivative. A file can carry an HDR label while some part of its processing history remains uncertain.
A screenshot is an especially weak substitute for this investigation. It records a rendered result through an operating system’s capture path. The resulting image may undergo another interpretation or conversion when shared. Two screenshots can document that people saw different appearances without establishing the exact values in the original video.
Read a tone curve without assuming it is a universal recipe
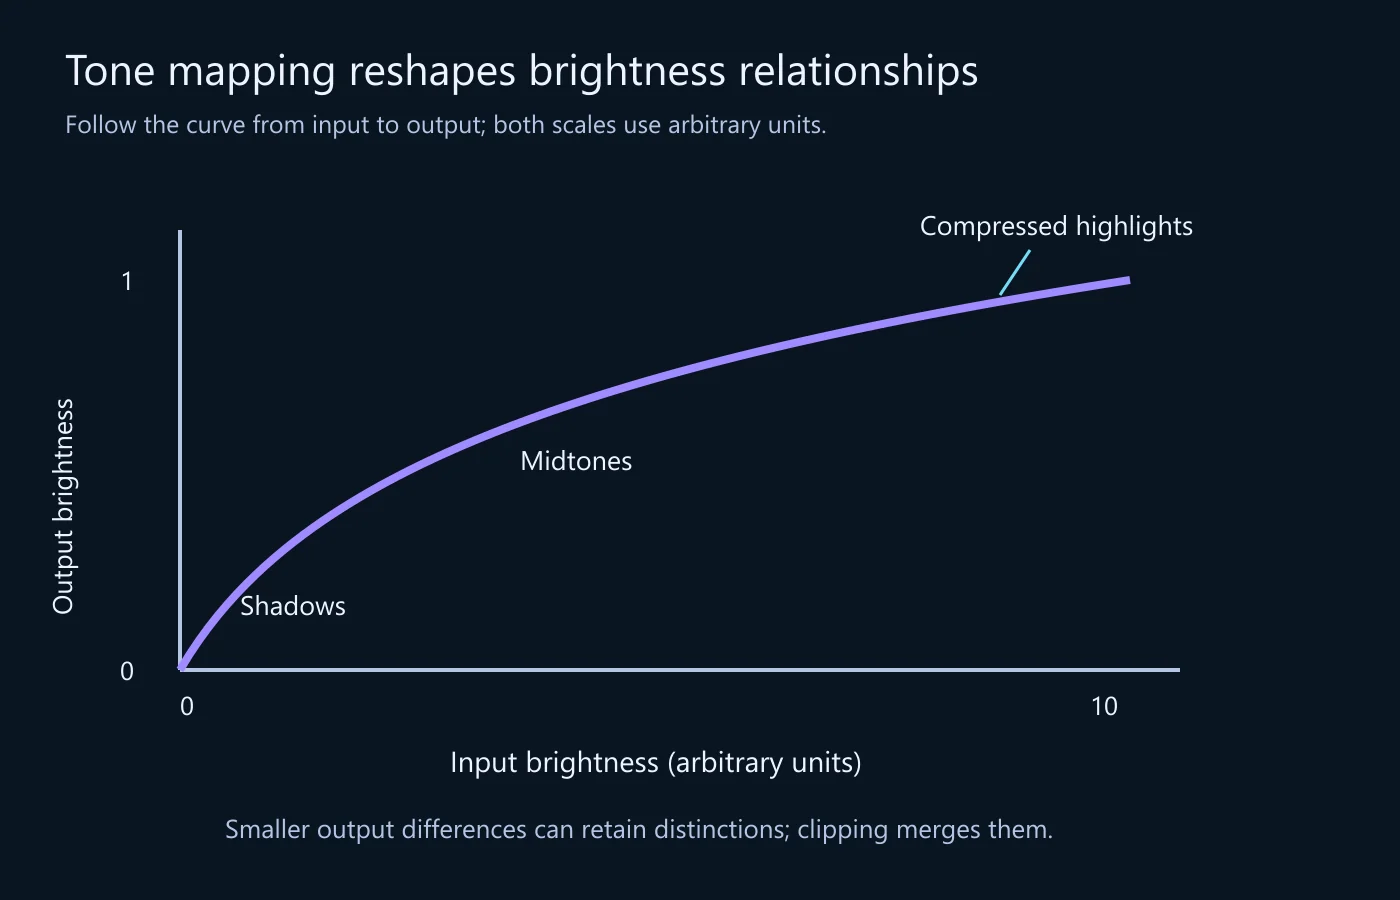
Imagine a simplified brightness scale from zero to ten in the input and zero to one in the output. These are arbitrary teaching units, not measured nits or an encoding standard. A straight division by ten would fit everything into the output range, but it would also compress the portion containing ordinary midtone detail.
Instead, a deliberately chosen curve could preserve more separation among lower and middle input values, then bend over gradually near the highlights. The top of the curve is often called its shoulder. Different bright inputs still have different outputs, but their separation becomes smaller. This is one way to understand highlight compression without pretending that a single formula suits every scene.
Clipping does something different. If every input above a threshold receives the same maximum output, distinctions above that threshold disappear in the rendition. A bright cloud’s different levels can become a flat patch. A smooth shoulder may preserve some of those distinctions, but it cannot recover variations that were already clipped during capture or an earlier processing stage.
There is also a creative choice about which parts deserve the most contrast. Global mapping applies a relationship across the image; local approaches can consider spatial context. Local adjustments can help a scene remain readable, but aggressive processing may create visible edge relationships or an unnatural impression. The mere presence of a bright edge does not identify which algorithm was used.
Keep brightness range, color gamut and compression separate
Dynamic range concerns the span between darker and brighter represented levels. Color gamut concerns the range of colors a system can represent or reproduce. Transfer characteristics describe how signal values relate to light. These properties interact in a pipeline, but they are not synonyms. An output can require both brightness adaptation and color-gamut conversion.
This matters when someone says that tone mapping “fixed the colors.” The improvement may involve several coordinated operations. A saturated highlight might change because its brightness was compressed, because a color fell outside the destination gamut, or because the source was interpreted differently. Without the processing settings, the visible result does not identify a single operation.
Encoding compression is another separate issue. A low-bitrate export can add artifacts regardless of whether its brightness mapping is appropriate. Re-encoding a file does not necessarily change HDR to SDR, and an HDR-to-SDR conversion may include re-encoding. Describe both where both occur rather than using “compressed” to explain every difference.
Color banding concerns visible steps where a smooth transition was expected. Tone mapping can change how such steps appear, but the concepts remain distinct. A guide to mapping should not turn into a quantization tutorial. If a sky changes from a smooth gradient into stripes, investigate the available precision and processing history alongside the brightness interpretation.
Locate the disagreement before changing settings
The most efficient first question is whether you are comparing the same file. A platform’s mobile application, browser player and download option may supply different derivatives. If you compare an HDR stream on one device with an SDR export on another, the screens are not the only variable. Write down how each copy was obtained.
Next identify the viewing path: application, output mode and display capability. Check documented settings rather than guessing from the device’s marketing name. An external monitor introduces its own connection and mode choices. Do not assume that a screen supports a particular format simply because another screen from the same brand does.
Recorded format information can help identify what to investigate. The video metadata guide explains how to read file information without treating it as a guarantee of origin. Keep a reported HDR characteristic separate from a verified account of the whole pipeline: the field may describe the supplied copy while leaving earlier conversions unknown.
Compare a short interval containing relevant highlights and shadows. Keep the original files untouched. If a supported viewing setting changes the appearance, note the original value and restore it afterward. Avoid service menus, system-wide resets or unrelated calibration changes for a simple diagnostic comparison.
| Where the mismatch appears | Check next | Do not assume |
|---|---|---|
| Only a shared screenshot looks washed out | The underlying video and screenshot export path | The camera recorded washed-out colors |
| One application differs on the same screen | Its documented color and HDR handling | The video file changed |
| An SDR export loses highlight detail | Source interpretation and export mapping | All HDR-to-SDR conversion must lose that detail |
| Every copy shows a flat highlight | An earlier source, if available | Missing detail can be recovered by a display control |
A worked example: the window looks different after sharing
A creator records a conversation near a bright window. On the recording device, the face looks comfortable and the outdoor clouds remain visible. A shared copy on a laptop looks pale, and a screenshot makes the window almost white. This example is a reasoning exercise, not a report of a tested application.
Separate the three versions
Name the recording file, the shared video and the screenshot separately. Record their actual dimensions and how they were obtained. The screenshot may have a larger pixel count than the shared video without preserving its brightness encoding. Pixel dimensions alone do not establish that two items carry the same image information.
Open the shared video rather than judging it through the screenshot. If it already differs from the recording file on the same supported playback path, the export or distribution process becomes relevant. If the two files look similar there but differ on another device, presentation needs further investigation. These are useful branches, not conclusive diagnoses.
Inspect interpretation before adding a corrective look
In an editor, verify the source’s supported color interpretation and the intended output. Applying an arbitrary contrast adjustment to an incorrectly interpreted file may make one scene look pleasant while leaving the pipeline wrong. The next export can then behave differently again, especially when mixed with other sources.
Adobe’s Premiere guidance illustrates how a named editor handles HDR-to-SDR presentation through its color-management workflow. Use the documentation matching the installed version. A setting’s existence in one editor is not evidence that another editor uses the same default or processing order.
Compare the result in the intended destination
Export a separate test copy for the required destination, retain its settings, and inspect it there. Ask whether the face, window and scene relationships remain useful—not whether it exactly reproduces the brightness of a different display. Keep the earlier copy so an unsuccessful adjustment can be reversed without another generation of lossy processing.
A proportionate result could read: “The supplied SDR derivative presents the highlights differently from the source on the tested playback path. The scene objects remain consistent in the compared interval. Further evaluation of capture or editing would require other evidence.” This documents the observed mismatch without converting a color issue into a scene-authenticity claim.
Why one correction rarely works for every clip
A dim interior and a concert with intense spotlights place different demands on a mapping choice. A curve that makes a face readable may flatten the intended contrast of a night scene. If you apply a preset to a collection, review representative scenes rather than assume the best-looking example predicts the rest.
Mixed footage adds another challenge. An SDR graphic placed over HDR video needs a deliberate relationship to the scene and output. Otherwise, text or logos can seem unexpectedly bright or muted. This is a compositing and color-management question, not a reason to label the overlay’s creator deceptive.
Avoid accidental repeated mapping. If one stage already produced an SDR rendition and another stage treats it as an unprocessed HDR source, the resulting appearance can drift further. The practical safeguard is a clear record of the input, output and interpretation at each handoff. More correction is not always a better correction.
Different displays and surroundings also affect the viewing experience. A result evaluated in a bright room may feel different in a dark room. Document those conditions when the comparison matters, but do not imply that a casual device comparison is a calibrated luminance measurement. Technical measurements require suitable equipment and an appropriate procedure.
What tone mapping cannot tell you
A plausible mapping explanation does not prove that a clip is unedited. It only explains why brightness relationships can differ without changing the depicted geometry or action. Generated content can be tone mapped too. Conversely, ordinary recorded material can have an intentionally misleading grade or caption. Origin, processing and meaning need separate evidence.
Nor can a tone curve recover unlimited highlight or shadow information. If a region was clipped, obscured by noise or discarded in an earlier rendition, a pleasing output cannot guarantee restoration of the scene’s exact appearance. Treat labels such as “recovered” or “enhanced” as descriptions to investigate, not as proof of restored observations.
If your task requires comparing a person’s clothing color, a screen indicator or another consequential detail, use a suitable source and viewing path. Be particularly cautious when comparing tiny patches from screenshots taken on unrelated devices. Their differences can reflect several stages at once, making a confident physical-color conclusion unwarranted.
A useful delivery note is short and specific
Before asking someone to make a replacement export, specify its purpose. A social post, an archive master and a comparison copy are not necessarily the same deliverable. Name the destination, whether HDR presentation is expected, and which source should be used. Otherwise, “please fix the brightness” can lead to an attractive but undocumented second rendition that makes the original disagreement harder to understand.
Keep a small reference interval with both a relevant face or midtone object and a demanding highlight. Explain why those regions matter: perhaps facial visibility is essential, while a window’s detailed view is not. This makes a creative tradeoff explicit instead of suggesting that one technically named setting determines the only acceptable appearance.
When receiving the new copy, compare the whole selected interval, not only the frame used to request the change. A gradual camera move can bring a bright surface into view, and a solution that looks good in one instant may produce an abrupt change elsewhere. Record whether the improvement concerns readability, consistency or technical compatibility. Those are useful outcomes, but they are different claims.
For an editor or publisher, record the source version, how it was interpreted, the intended output and the application/version used. Note whether the supplied copy is meant for HDR presentation or an SDR destination. This gives the next person a starting point without requiring a long account of every creative decision.
For a viewer reporting a problem, say which file or public version you watched, where you watched it and what looked different. “Highlights appear flat in this browser view; the downloaded version differs on the same device” is actionable. “The colors prove AI” substitutes a broad accusation for the actual viewing evidence.
For a reviewer, preserve both the source and any diagnostic export. Do not replace the source with the version you find most visually convincing. The broader video forensics guide explains why technical observations need context. Tone mapping contributes one bounded explanation within that larger assessment.
Quick answers about HDR appearance
Is tone mapping a filter that adds detail?
No. Its core purpose is adapting tonal relationships to an output. It can make existing distinctions easier to see in that rendition, but it does not establish that missing scene detail has been recovered. Sharpening, denoising and generative reconstruction are different operations even when software combines them in one workflow.
Should HDR and SDR copies look identical?
They can preserve a coherent creative intent without producing identical emitted light. The output ranges and viewing paths differ. Evaluate whether important relationships survive and whether the destination is handled correctly, not whether two screenshots match pixel for pixel.
Does a washed-out image prove a broken file?
No. The file may be intact while a player or export path interprets it incorrectly. Start by comparing the same source through a documented compatible path. If the mismatch remains, investigate the file and its history rather than assuming either the device or the recording is necessarily at fault.
The reliable sequence is interpretation, adaptation, then evaluation at the destination. Keep those stages visible and an unsettling color difference becomes a question you can investigate, rather than a mystery you must explain with a guess.
Technical references
- Android Developers: Tone mapping—supporting HDR and SDR content — distinguishes conversion from interpreting HDR as SDR.
- Adobe: Tone mapping HDR to SDR video in Premiere — a specific color-managed editing workflow, not a universal device prescription.
The arbitrary-unit curve and window-sharing scenario explain decisions; they are not measurements of a particular display or export.