
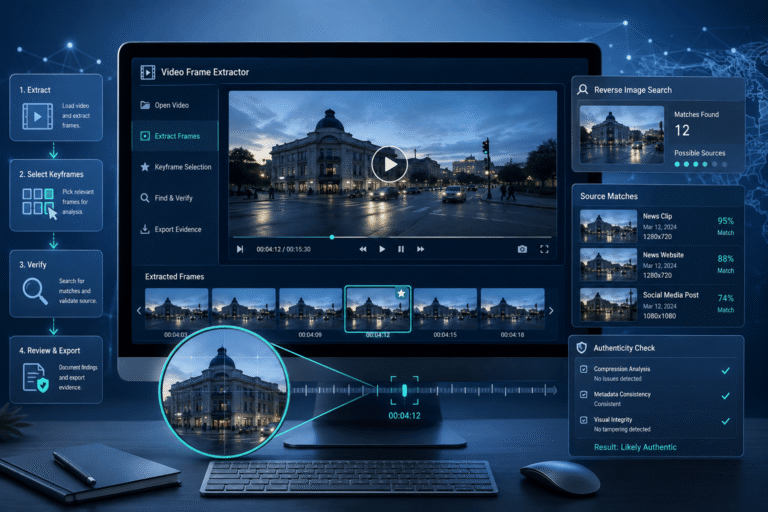
A video frame extractor turns selected moments from a video into still images that you can inspect, save, compare, or reverse search. For verification, the goal is not to export as many frames as possible. It is to extract a small set of clear, distinctive frames that preserve useful visual evidence such as landmarks, signs, logos, faces, vehicles, objects, text, or an unusual scene.
The workflow is straightforward: extract frames, remove weak or repetitive images, keep the most searchable ones, then use those stills to trace earlier copies or investigate the source. A frame can help you find where a video appeared before, but it cannot by itself prove that the entire video is authentic or establish the exact recording date.
What Does a Video Frame Extractor Actually Do?
A digital video is presented as a sequence of images over time. A frame extractor decodes selected moments from that sequence and saves them as individual image files, commonly PNG or JPEG.
That sounds simple, but there are several different reasons to extract frames:
- to capture a clean still image from a video
- to read a sign, license plate, logo, or on-screen detail
- to compare different moments in the same clip
- to create reference images for reverse image search
- to trace an earlier version of viral footage
- to document a particular frame for a verification report
- to inspect temporal changes more carefully outside normal playback
The best extraction method depends on which of those questions you are trying to answer.
Video Frames, Codec Keyframes and Verification Frames Are Not the Same Thing
The word keyframe is used in two different ways, and confusing them can lead to poor verification choices.
| Term | What it means | Why it matters |
|---|---|---|
| Video frame | One decoded image at a particular moment in the video | Any decoded frame can potentially contain useful evidence |
| Codec keyframe or sync frame | A frame used as a decoding restart point, with no dependency on earlier displayed frames in the relevant decoding chain | Important for compression, seeking, streaming, and decoding |
| Verification keyframe | An informal verification term for a representative or useful still selected from the video | Chosen because it is distinctive, clear, and useful for source tracing or inspection |
Apple’s VideoToolbox documentation explains that keyframes, also called sync frames, reset inter-frame dependencies and allow a decoder to continue correctly from that point. FFmpeg can likewise select frames based on picture type, including I-frames. These are technical codec concepts, not a guarantee that the selected image is visually useful for investigation. See Apple’s keyframe interval documentation.
By contrast, fact-checking tools often use keyframes in a practical sense to mean useful stills extracted from a clip. A verification frame containing a storefront name or unusual landmark may be far more searchable than a codec I-frame that happens to show a blurred transition.
The Best Verification Frame Has Information Density
A useful frame does more than look attractive. It gives a search engine or investigator something distinctive to work with.
For reverse search, visual distinctiveness often matters more than cinematic quality. A technically clean close-up of a generic wall may be less useful than a slightly softer frame showing a unique building and street sign together.
Frames That Usually Perform Poorly in Reverse Search
Some images contain too little stable information to be useful. Deprioritize frames with:
- strong motion blur
- fade-ins, fade-outs, dissolves, or transition effects
- large subtitles or stickers covering the important subject
- very dark or overexposed scenes
- extreme digital zoom
- heavy blockiness from repeated compression
- near-duplicate views from the same shot
- generic backgrounds with no identifiable detail
Do not discard an overlaid frame automatically if the overlay itself is useful. A television logo, username, timestamp, watermark, or caption may help identify where a particular version came from. The key is to distinguish evidence from obstruction.
How Many Frames Should You Extract?
There is no universal number because a ten-second single-shot clip and a five-minute montage have completely different information density.
A practical verification heuristic is to start with a small, diverse set. For a short clip, roughly five to ten visually different frames is often enough for the first search pass. This is not a technical standard. It is a way to avoid wasting time on dozens of nearly identical images.
If the video contains multiple cuts, prioritize coverage across scenes:
- one or two clear frames from the opening scene
- frames around major scene changes
- frames containing unique text, people, or landmarks
- a clear frame from the ending scene
If none produce useful results, expand the set. The principle is coverage before density.
Method 1: Extract a Single Frame With VLC
For manual verification, VLC is one of the simplest desktop options. Open the video, pause at the moment you want, move to the clearest nearby frame, then choose Video > Take Snapshot. VLC’s official documentation says the desktop snapshot function saves the displayed video frame as an image and uses PNG by default in the documented desktop workflow. See the VLC snapshot documentation.
This method is useful when:
- you need only a few images
- you want to inspect the clip manually before choosing frames
- you do not want to use command-line tools
It is less efficient when you need systematic extraction from a long video.
Method 2: Extract an Exact Moment With FFmpeg
FFmpeg gives you precise control over frame extraction and works well when you already know the timestamp you want.
To save one frame at approximately 12.5 seconds:
ffmpeg -ss 00:00:12.500 -i input.mp4 -frames:v 1 frame.pngFFmpeg documents -ss as its seek option. When it is used before the input, FFmpeg seeks to the closest suitable seek point and, with accurate seeking enabled during transcoding, decodes and discards the extra segment until it reaches the requested position. See the FFmpeg command documentation.
PNG is a practical choice when you want to avoid adding JPEG compression to the exported still. JPEG is smaller and can be convenient for routine search work, but it introduces another lossy encoding step.
Method 3: Extract Frames at Regular Intervals
If you want a quick overview of a longer clip, extract one frame at a fixed interval. For example, the following command samples one frame every ten seconds:
ffmpeg -i input.mp4 -vf "fps=1/10" frame-%04d.pngThis is useful for browsing, but fixed intervals have an obvious weakness: they do not know where meaningful scenes begin. A distinctive event can occur between sampling points.
Use interval extraction as a first-pass map, not as a guarantee that you captured the best evidence.
Method 4: Let FFmpeg Choose Representative Frames
FFmpeg includes a thumbnail filter that selects a representative frame from each analyzed batch of consecutive frames. The official FFmpeg filter documentation describes it as selecting the most representative frame in a sequence and allows the batch size to be configured.
A simple example is:
ffmpeg -i input.mp4 -vf "thumbnail=100" -fps_mode vfr thumb-%04d.pngThis can reduce repetitive output, but “representative” is not the same as “best for reverse search.” The filter does not know that a street sign, face, unique object, or geographic clue is important to your investigation. Treat automated selection as candidate generation, then review the results manually.
Method 5: Extract Keyframes With InVID-WeVerify
For verification work involving online video, InVID-WeVerify is designed around the fact-checking workflow. Its verification plugin can fragment supported online videos and local files into keyframes, then pass those stills into reverse image search and other analysis tools. The project describes the plugin as a verification toolkit for journalists and social-media content. See the InVID Verification Plugin.
AFP also teaches the same basic process: load a video into the plugin, extract keyframes, and reverse search selected stills to investigate where the footage appeared before. This is an important distinction between frame extraction as a media operation and frame extraction as a verification workflow.
Screenshots vs Direct Frame Extraction
A screenshot can be perfectly adequate for a quick search, especially when you only have access to a video inside an app. But if you possess the actual video file, direct extraction gives you more control.
| Method | Advantages | Limitations |
|---|---|---|
| Direct frame extraction | Can preserve the decoded frame dimensions, avoids player controls, supports repeatable timestamps and batch extraction | Requires access to the file or a compatible tool |
| Player snapshot | Simple, clean, often preserves more of the video image than a general screen capture | Behavior and output settings depend on the player |
| Device screenshot | Available almost everywhere and useful when the video cannot be downloaded | May include interface elements, may be limited by display size, and adds another rendering step |
On mobile, a screenshot is often the fastest practical method. Pause the clip, hide playback controls if possible, choose a sharp moment, and capture the full video area. If an app offers an explicit frame-export or save-frame function, prefer that over photographing or screen-recording the display.
Do Not Upscale a Weak Frame Before the First Search
If a frame is tiny or compressed, artificial upscaling can make it easier for a human to inspect, but it does not restore missing original detail. Some enhancement methods can also invent or reshape fine texture.
For source tracing, start with the least altered version you have. If you later create an enhanced copy for readability, keep the original extracted frame as a separate reference.
What to Do After You Extract the Frames
Frame extraction is preparation. The next step is to search and interpret the stills.
1. Start with the most distinctive frame
Choose the image with the strongest combination of clarity and unique visual information. If the video has text, a recognizable building, product packaging, unusual clothing, or a distinctive background, start there.
2. Reverse search the complete frame
Google Lens allows you to upload an image and can return similar images, websites containing the same or similar image, and results related to objects within the image. Google’s documentation also supports selecting part of an image when a smaller region is more useful. See the Google Lens image-search instructions.
For a broader comparison of search methods, use the DetectVideo.ai guide to reverse image search for video frames.
3. Search a cropped region when the whole frame is too generic
If the frame contains one useful element surrounded by irrelevant background, search the distinctive region separately. Good candidates include:
- a building sign
- a product label
- a vehicle marking
- a monument
- a unique piece of clothing
- a logo or emblem
Keep the uncropped frame too. Cropping removes context that may matter later.
4. Test another scene, not just another adjacent frame
If the first image fails, do not immediately search ten frames from the same second. Move to a different shot, camera angle, or moment with different evidence.
5. Compare matches chronologically and contextually
A search result is useful only if you investigate it. Check publication dates, uploader identity, captions, longer versions, and whether the matched page predates the claim you are examining.
The dedicated reverse video search workflow explains how these frame matches can be used to trace reposts and earlier versions.
What a Reverse Search Match Can Actually Prove
Suppose you extract a frame from a video being shared as footage from today’s event and find the same image in an article from three years earlier.
That is strong evidence that the visual material existed before the current event. It can directly contradict the claim that this particular visual was first recorded today.
But an earlier match does not automatically establish:
- the exact date the original camera recording was made
- the identity of the original camera operator
- whether later copies were edited
- whether the audio in the current version is original
- whether every part of the current video is authentic
Those are separate provenance and media-integrity questions.
Why “No Match Found” Is Not an Authenticity Result
A reverse search can fail for ordinary reasons:
- the source was never indexed
- the upload was private or deleted
- the clip is new
- the frame was heavily cropped
- the video was mirrored or reframed
- compression changed the image substantially
- you selected a generic or blurry frame
Therefore, no search result means only that the search did not produce a useful match. It does not establish originality or authenticity.
How Reposts, Crops and Compression Change Your Frame Strategy
Social platforms routinely transform video during upload and delivery. Reposts may also add borders, subtitles, reaction windows, watermarks, or zoomed crops. These changes can reduce visual similarity between your frame and the source.
When the first search fails:
- try a frame from another scene
- crop out a large repost border or reaction panel while preserving the original copy separately
- search a distinctive object inside the frame
- try frames before and after a transition
- look for visible usernames, logos, captions, or watermarks that can be searched as text
If you find an earlier version, compare it with the current one rather than assuming they are identical.
Frame Extraction Can Reveal Source History, Not Full Video Provenance
Frame matching is powerful because it can connect one visual moment to earlier copies. But video provenance is broader. It asks where the asset came from, how versions relate to each other, what transformations occurred, and how the claim around the media changed.
If your investigation depends on reconstructing that history, continue with the video provenance guide.
When Frame Extraction Is Not Enough
A still image removes time, and some important manipulation signals exist only across time.
Frame-based searching is not sufficient when the central question involves:
- AI-generated motion
- face identity changing across frames
- lip synchronization
- audio substitution or voice cloning
- frame insertion or deletion
- speed changes
- temporal inconsistencies
- compression patterns across the sequence
At that point, you need to return to the video as a time-based object rather than judging isolated images.
A Practical Frame Selection Scorecard
Before reverse searching a still, score it informally against four questions:
If a frame performs poorly on most of these questions, extract another one before spending time searching it.
A Compact Verification Workflow
- Preserve the best available video. Keep the original file or source URL if possible.
- Review the whole clip first. Identify scene changes, distinctive objects, text, faces, and location clues.
- Extract a diverse set of frames. Prefer different scenes over adjacent near-duplicates.
- Keep the clean originals. Create cropped or enhanced copies separately.
- Reverse search the strongest frames. Search the full image first, then useful regions if necessary.
- Investigate matches. Compare dates, sources, captions, and longer versions.
- State only what the evidence supports. An earlier match, no match, and a technical manipulation signal are different findings.
The wider process for combining source, context, provenance, and technical evidence is covered in the video verification guide.
Where DetectVideo AI Fits
Frame extraction is excellent for turning moving footage into searchable evidence. It can help you trace where imagery appeared before and identify source relationships.
If the unresolved question is instead whether the video itself contains signs of AI generation, manipulation, or other forensic anomalies, analyze the time-based media rather than relying only on extracted stills. DetectVideo AI can add a technical analysis layer to supported video while source tracing and contextual verification remain separate parts of the investigation.
Key Takeaway
A good video frame extractor workflow is selective, not exhaustive. The objective is to turn a moving clip into a small set of images that preserve the most useful evidence.
Do not confuse codec keyframes with the best frames for verification. Choose clear, distinctive moments from different scenes, preserve an unaltered copy of each extraction, and use reverse search to look for earlier occurrences. Then interpret those matches carefully: frame search can reveal source history, but it does not replace provenance analysis or full video forensics.
FAQ About Video Frame Extraction
How do I extract a frame from a video?
You can pause the video and use a player’s snapshot function, or use a frame extraction tool such as FFmpeg. If you have the original file, direct extraction gives you more control over timestamps, output format, and batch processing.
What is a keyframe in a video?
In video compression, a keyframe or sync frame is a decoding reference point that does not depend on earlier frames in the same way predicted frames do. In verification work, people also use “keyframe” more loosely for a representative still chosen from a video. The two meanings should not be treated as identical.
Can I reverse image search a video frame?
Yes. Export a clear still image and upload it to a reverse image search service such as Google Lens. Results may reveal similar images, websites containing the frame or a related version, and earlier copies of the visual.
What is the best frame to use for reverse search?
Choose a sharp frame with distinctive visual information such as a landmark, sign, logo, face, unusual object, vehicle, building, or readable text. Frames from different scenes usually provide more search coverage than many adjacent frames.
Does extracting frames reduce image quality?
Decoding a video frame and saving it does not recover detail that was already lost in the compressed video. Saving to a lossless image format such as PNG avoids adding JPEG compression to the exported still. A screenshot may introduce additional scaling or interface elements depending on the device and player.
Can a video frame reveal the original source?
Sometimes. Reverse searching a distinctive frame can lead to earlier uploads or longer versions of the same footage. The earliest match you find is an earlier known occurrence, not automatically proof that it is the original recording.
How many frames should I reverse search?
There is no fixed number. Start with a small set of visually different, high-information frames and expand only if the first searches fail. For short clips, a handful of distinct frames is usually more efficient than dozens of near-duplicates.
Is an I-frame always the best frame for verification?
No. I-frames are important for video decoding and compression. The best verification frame is the one that contains the clearest and most distinctive evidence for your question, regardless of its codec frame type.